Top 20 Time-Saving Tips for SA Users
 Who loves saving time and learning short-cuts that can make your job easier? Below is a list of miscellaneous SA tricks and short-cuts from the NRK team that will help you save time and effort.
Top 20 Time-Saving Tips for SA Users
Who loves saving time and learning short-cuts that can make your job easier? Below is a list of miscellaneous SA tricks and short-cuts from the NRK team that will help you save time and effort.

-
1. Jump Instrument to New Location.
In one step you can add a new instrument model, disconnect from the current instrument, and reconnect the interface to this second station.
-
2. Repeat last function(s), use Ctrl + Tab or Crtl + Shift + Tab.
With these simple keyboard shortcuts you can repeat the last function, or access a list of recent commands in a single click.
-
3. Customize a job, set up report templates, and define User Interface Profiles.
This allows you to set up SA to open with all your favorite features and customized personal settings.
-
4. Edit >>Rename >>Points >>Points by Auto-Corresponding Groups.
Point names can be easily corrected for operations such as a best fit using proximity or inter-point distance.
-
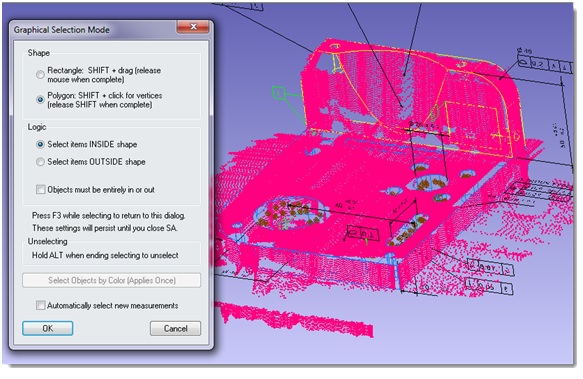
5. Graphical selection mode.
The graphical selection process can be more precise with polygon and custom logic setting.
-
6. F2 provides a filtered list for quick selection.
When you need to precisely pick items for an operation, F2 simplifies the process. It provides a filtered list and the ability to multi-select.
-
7. Use Ctrl + H to bring up the Hover Window.
This is useful when trying to figure out what entities are on the screen and where they are located in the SA tree.
-
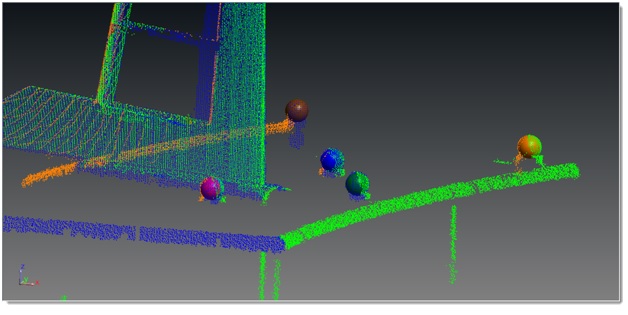
8. Construct >>Points >>From Cloud Points >>Auto-detect Sphere Centers.
To register a set of point clouds, simply scan spheres and fit the center points together. This function will find those center points by automatically searching the cloud data and locating them.
-
9. Use Drag and Drop Import to drag files.
This function operates like the Auto-Import toolbar button by allowing you to quickly import a wide variety of files without hunting down the option within the menus.
-
10. Construct >>Surfaces >>By Dissecting Surfaces.
Build and isolate only the surfaces of interest from a large model. This will improve highlights, make surface reversal easy, and prevent wrong CAD surface for comparison.
-
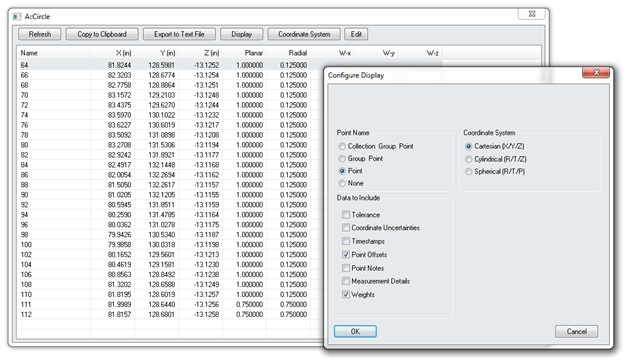
11. View Point List for complete point property control.
If you want to make sure the probe offsets are set correctly, the tolerances are all in order, or the point weights are set, you can find it here.
-
12. Use the Group Manager to organize your points.
Did you put your points in the wrong folders or group them incorrectly? Group Manager allows dragging and dropping, cutting, pasting, and copying.
-
13. Right-click options in the Graphics on Points, Objects, and Instruments:
-
• Find in SA tree
-
• Center in View
-
• Run Interface and Connect
-
• Generate a Quick Report and Add to Active SA Report
-
• Add Watch Window
-
14. Take advantage of the Steady Point measurement profile.
This profile allows an operator to automatically re-measure points until the RMS is under a threshold.
-
15. Combine multiple surfaces into a Merged Surface, then “Watch” the Merged Surface.
Rather than adding multiple watch windows, this provides a way for you to watch them all in one window.
-
16. GD&T Auto-Filter for quick point association with Datums and Feature Checks.
Automatically associate points in a job by proximity to the feature so you don’t have to hunt them down in the SA tree. There is also a special hole detection feature that grabs points measured along a hole’s axis.
-
17. Construct >> Points >>Layout >> Center of Surface Holes.
Create the nominal circle centers for all the holes on a surface within your selection criteria in one go.
-
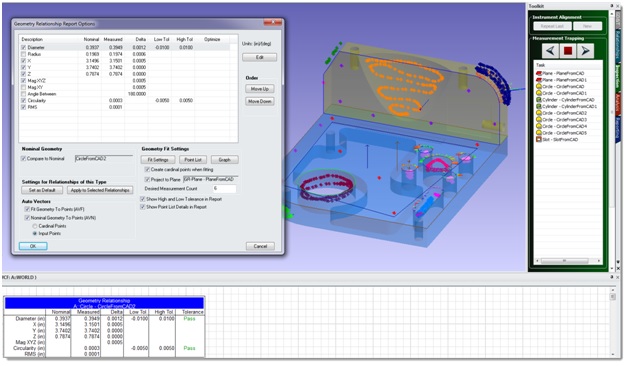
18. SA Toolkit Inspection and simple scripting tools.
With preset measurement counts, callout guidance, feature highlighting, predefined measurement profiles and tooling, and Sweep & Move, the SA Toolkit offers a streamlined method for simple part inspection.
-
19. Group to Nominal Group Relationships.
This gives you bull’s-eyes to guide you to the points to be measured, a built-in closed point watch window, auto-vectors, and a built-in auto-renaming function to measure a set of nominal points.
-
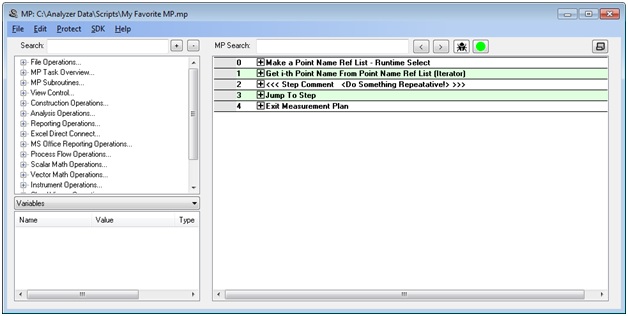
20. Build simple loops in MP to automate any process.
Below is a short MP that provides the structure for a loop that can be used again and again just by changing step #2 to the task at hand. Regardless of the task, the MP always takes the same form; a prompted (“Runtime”) selection, then an iterator that goes through the points one by one, and then the task assigned to the MP. Another variation of this can be accomplished by simply replacing the Point Selection & Iterator with an Object Selection & Iterator.
Questions? Do you have any hints or tips of your own that you’d like to share? Contact NRK at support@kinematics.com.
Sign up to receive our eNewsletter and other product updates by clicking here.